2016 Honda Africa Twin
Purchased 5-31-16
This page updated 2-14-19
28,000 miles on the bike now.
Pictures of the new Garmin 276CX gps mounted are at the bottom of the page.
It all always starts at the dealer--------Glodich Honda
in West Frankfort, Illinois.
They are a very old school dealer and have been in business since 1962----a
family run dealer and
they are so nice. I highly recommend them---they sell a lot of bikes.
I had drove my Ford van down there just to look at it----bought it---but it
wouldn't fit in my van.
BoooooHooooooo I had to ride it home.
Actually it will fit in my van---I was a bit hasty in my measuring.
Got Home-----------Sweet Thing said "What''s that ?? and Where's your
van" ??????------------------Long Pause.
She should be used to this by now you'd think ???
.jpg)
What's that Shania Twain song ????
"Honey---I'm Home" !!!!
.jpg)
Here it is all finished---but read on to see how it got there.
.jpg)
Oh---I did add these.
.jpg)
First thing first---------GPS and heated grip wiring.
If you are an extremely easy going guy----don't have high
blood pressure----never use a bigger hammer
when it ain't going right---aren't nervous---never in a
hurry
and never throw things----or force things---don't carry a gun------don't cuss---go
a ahead and remove all those front
fairing panels to tie into the wiring up there.
What I'm sayin' is---------it is very tedious.
I'm not going to tell you every move to get it all off--------you
are on your own.
Once off unplug the great big connector going to that fancy dash display---and
get it out of the way.
.jpg)
Down in there somewhere is this white plug with a dummy
plug in it--------on my bike none of these wires were used.
It's very fiddly getting it out of there---very----Red/Yellow is 12 volt switched
power and the green is a ground.
I don't care what the other wires are for---they don't go anywhere..
If you don't have good temperament like described above--------you will have slit your throat by now.
.jpg)
Things are all tidy'd up with shrink tube------I'm not
putting in a fuse------it's already fused.
So put it back together--------as hard as it was to take apart.
.jpg)
.jpg)
All done.
My eyes look way over the windshield so this is just fine.
.jpg)
.jpg)
My Wolfman Blackhawk tankbag I already had fits on here nicely.
.jpg)
I've always used the "Hot Grip" brand of heated
grips for years---probably have bought 15 sets of them.
But----I thought I'd try these---nice controller. According to Oxford you
don't have to put them on a
switched circuit as ithey will shut off automatically somehow ?????
I wired these straight to the battery with a fuse in line---and ran another
wire while I was at it to power my
heated vest which will also serveas a place to charge my phone, run my compressor
or charge the bikes battery if I need to.
Also this kit (the adventure kit) came with this really neat bracket to attach
the controller to the back half of the
mirror mount---pretty handy.
I had to trim the hot grips a bit as they were too long---that is OK according
to their instructions as long as
you don't trim them too much and get into the wires.
.jpg)
I'm a big fan of HDB (Highway Dirt Bike) handguards. Got
them on my 690 KTM too.
These were a bit problematic to install as I had to drill a hole about 5/8"
in diameter in the ends to accomodate the huge bolt
that screws into the tapped handlebars and holds the bar-end weights.
.jpg)
.jpg)
The coolest part of these handguards is they come with
a top handlebar clamp and your handguards attach to them.
Attaching handguards to the handlebars is sometimes not as good and is very
problematic itself---as with all the wires we
have now-a-days there is not room.
Another problem I had is because the handlebars on the
AT are very wide and the handguards were too short.
I had to make an extension to make this work as you can see in the picture.
.jpg)
A close-up of the extension.
.jpg)
I don't have too many miles on the bike yest---but so far
it's been perfect and is everything I hoped it would be.
Holey smokes that motor is so smooth, powerful and will pull right down to
an idle without bucking and jumping.
The fuel injection is spot on.
This is a SW Motech rack--specifically built for the African Twin-----------2 minute install and I didn't read the instructions.
.jpg)
If I didn't say--------I took off the rear passenger pegs. They stick way out and I never carry a passenger.
.jpg)
It's says 11lb. capacity.
.jpg)
Had this wolfman "wolftail" hanging around the
shop.
Wolfman sends bungy cords that come out of the bottom of the bag which has
hooks on them to hold this on.
I bolted mine on----thru the 4 eyelets in the bottom of the bag and drilled
4 small holes into the aluminum rack.
I don't see me ever taking it off.
.jpg)
.jpg)
The racks are from Touratech and are stainless steel.
Very solid mounting---one bracket goes under the fender--attatches to the
frame and then to the
other side---can't be seen in the picture.
.jpg)
They slip into one of the slots meant for the Honda bags---very nice.
.jpg)
I have 2 sets of wolfman saddlebags---the Rocky Moutains
and the expeditions.
Either can mount to this rack with Wolfman's universal straps.
.jpg)
.jpg)
So my universal wolfman straps came in today and that allows
me to mount my wolfman saddle bags to these racks.
These are the expeditions.
I'm pretty much done with this bike right now--maybe a few little things later---but
it's ready to travel right now.
.jpg)
.jpg)
Here are my Rocky Mountains bags---quite a bit bigger---still
dirty from my cross country run on my
Husqvarna last year.
These will fit right on these racks also.
I used these bags on a ride to Montana, Idaho and Wyoming on the AT just this
last July, 2016.
.jpg)
.jpg)
.jpg)
OK---the little footpegs with rubber on them have got to
go.
So in comes some IMS Pro footpegs---about $90.
As you can see they are much wider----but not too long---I don't like a long
footpeg as you can hang your
pant leg on them and over you go.
%20(1024x768).jpg)
A 10 minute install using the stock springs.
%20(1024x768).jpg)
%20(1024x768).jpg)
%20(1024x768).jpg)
So----------how do I like the bike and what do I think
of it ????
Might be kind of short and sweet--------as it's perfect.
No fuel injection glitches.
Suspension----perfect for me---fully adjustable compression, rebound and spring
pre-load.
Extremely short turning radius---you can easily turn the bike around on a
narrow country road without backing up.
490 watts of power available to power stuff.
The ABS on this bike is spectacular----unlike the ABS on my old BMW which
would get you killed in a rough steep downhill.
However I turn off the rear ABS in this bike in those situations-----just
in case. It's so nice you can do that.
The traction control has 3 levels of intensity and can be turned off with
you pointer finger in 2 seconds by a little lever on the left handlebar control.
This can be done on the fly while running. It works so well I'll leave it
on full most of the time.
The little stock windshield is absolutely amazing---I won't be putting on
anything bigger---I can ride with my face shield up with no buffeting.
I'm getting over 50 mpg with the 4.9 gallon tank.
Brakes are phenominal----but all bikes have great bikes now-a-days.
Will run on low grade fuel just fine.
Weights about 510 lbs.-----I won't be riding in mud and extreme terrain--------I've
got smaller bikes for that.
Transmission is super slick--------I like the 6-speed gearing for what I'm
going to do----I don't see me changing that.
The motor is just as sweet as can be----I don't need all the horsepower it's
got---but what do you do :)
The thin tread on the stock tires was making me nervous.
Great on the street tho.
So off comes the front tire.
Notice I'm heating the new tire in the sun----it got so hot I could hardly
handle it.
%20(1024x768).jpg)
I've changed my tire changing techniques over the years.
I now put the tube in the tire--------before mounting the first bead.
Then stick the valve stem thru the rim and barely put the nut on.
%20(1024x768).jpg)
Been using the "Baja No Pinch Tire Tool" for
quite a while.
It is only good for putting the tire on.
The advantages are:
1. No chance of pinching the tube---it puts both beads over the rim.
2. No chance of scratching your rim.
I put a TKC 80 on the front.
%20(1024x768).jpg)
I needed a buddy-----------but alas I was all alone ;(
But my Bead Buddy II comes to the rescue.
It's holds the first part of the bead in while I work the Baja No Pinch Tire
Tool around the tire.
%20(1024x768).jpg)
And a Heidenau Scout on the rear---Man that tire has some
really deep tread.
It was a booger to spoon on.
%20(1024x768).jpg)
Continental TKC80
These tires will be great for me--nothing too aggressive really--but way better
than those thin treads on the stock tire.
I didn't buy this bike to thrash in the mud and rugged
trails-----I have 3 other bike that are way faster, funner
and easier to ride in nasty terrain.
This is my road and easy offroad bike.
%20(1024x768).jpg)
My SW Motech center stand came into today for Revzilla.
Here's all the parts.
.jpg)
It took 6 minutes to install the center stand.
.jpg) \
\
However it took hours to install this spring.
Plus a trip to the ER----tool fabrication-----blood transfusions---stitches--poked
my eye out--- arm puncture-----and it
took 3 rolls of paper towels to soak up the blood.
Now awaiting mental therapy.
.jpg)
.jpg)
It was eezy peezy to put on the stand---couldn't believe how easy it was.
August, 2016
Just got back from Montana, Idaho and Wyoming on the bike.
It was awesome----------no complaints at all.
Used my bigger Rocky Mountain saddlebags for that ride.
.jpg)
Fabricated this up in the shop.
Tool Tube---this is the larger one--they make 2 sizes of these things I think---can't
remember where I got it ??
I think it was designed to hold the owners manual of a tractor ????
%20(1024x768).jpg)
I was going to put my tools in here but worried about the
weight breaking the plastic tabs on the tube.
So I put 2 inner tubes in there------took up all the room in there and those
aren't too heavy.
So I think it will be fine.
It's pretty self explanatory what I did to make this work.
No---it won't hit the tire or chain guard.
The tube is water proof once you plug up a small drain hole in the side of
the tube with silicone.
%20(1024x768).jpg)
Touratech upper and lower crashbars came in---about $400
I think ?????
Pretty easy install even tho I had no instructions---but did have a buddy
give me some advice
as he already had put some on his. It would have taken me 4 times as long
if not for this advice.
There were a couple tricky things when you had to figure out where everything
went all on your own
with just a bunch of parts, bolts and washers layin' on the workbench.
Getting a bracket up under the front of the fairing was
what I'd call----tricky.
And you have to have lot's of patience. Again-------no instructions.
.jpg)
And for another $1,200 you can have these nice little bags.
(just kidding).
Pretty nifty and handy really---they don't just velcro on to the bars----there
is a pocket on the back
of them and that pocket slips over the bars------then velcro. Works very well.
.jpg)
Kind of embarassing with all this Touratech stuff on my
bike.
Think I'll put a milk crate on the rear rack to balance things out.
.jpg)
I'm definitely going to go tubeless on the rear tire and
ordered this kit from Outex.
You can get it on E-bay--------------bike specific. About $140 I think ???
I thought I'd ordered a kit for the rear tire---but I was mistaken as there's
enough stuff in
there for the front too. I may not do the front---heck a 21" is so easy
to change a tube anyway.
But that rear Heidenau is tuff---I don't want to have to pull that tire off
in the middle of a trip.
You can still tighten or replace a spoke after doing this.
If you need to tighten a spoke--you just need to let the air out of the tire---tighten
the spoke then air
back up.
To replace a spoke and nipple---you need to do a repair---but they send you
stuff to do that also.
Here's how it came.
.jpg)
The double sided tape on the right is for the rear rim---on
the left for the front.
The white roll in the middle goes on top of the double side sticky tape and
is a protector---like
a rim strip you might say. Hopefully keep from damaging the sticky tape in
a tire change
as the sticky tape is what seals the air. There were some little round spoke
nipple protectors you
put on first.
%20(1024x768).jpg)
All done ready for the tire. The nipples stickup some and
as best you try it is impossible to get all the air
out. But-----I think the design is that when you add air pressure it pushes
the flexible sticky tape down to the rim
hard and tight as the air leaks out the spokes making an air tight seal.
I used my Baja No Pinch tire tool to put the tire on----------alas I couldn't
pinch the tube as there wasn't one ---Duh !!!!
As I fought getting that 150 tire off an on I was sorely
reminded why I didn't want to have to patch a tube
on the side of the road and why I was doing this-------that is one tough tire.
So glad I did this--now to go buy a tire plug kit.
%20(1024x768).jpg)
What's this--my UPS guy-------he's a regular at my house-----and I always sick my dog on him.
%20(1024x768).jpg)
JoJo my little dog has died---but before he did I think he scared my previous UPS person off.

So what's he got--------my new Touratech Skidplate------it
is compatible with the touratech crashbars.
$300 from Touratech.
%20(1024x768).jpg)
Took some tweaking and wallering out holes to get it to
fit. But I'm still amazed at how
manufactures do such a good job of this stuff usually.
%20(1024x768).jpg)
%20(1024x768).jpg)
%20(1024x768).jpg)
11-11-16 My new Garmin 276CX came in the mail.
.jpg)
It dropped right in the rugged amps mount my Montana gps was in----------a one second install.
.jpg)
It's big.
.jpg)
Never saw a gps screen this clear----and bright.
On high you could use it as a flashlight or tent light.
The visibility is incredible---never thought a gps screen could look this
good.
It works just exactly like the old 27X's series gps's Garmin made---but much
more memory for everything.
.jpg)
.jpg)
No--it's not blocking my vision.
.jpg)
Just the screen is pretty much as wide as a Montana's entire
case-----and it actually taller than
the Montana's case (vertically).
.jpg)
7-5-17
Installed Adventure Monster Model 60 Off Road Flood Lites
with dimmer module.
Finished product below------daylight out of dark.
%20(1024x768).jpg)
Here's what all I bought---the lites when I bought them
were $80 each and the
2 brackets to mount them to my 25mm crashbars were about $55 I think.
The brackets come with multiple shims to accomodate different size bars.
I did also by a dimmer module -------about $60
Go HERE to purchase.
%20(1024x768).jpg)
Not quite done--need to route some wiring.
I tapped into the unused plug behind the the dash module to power these.
%20(1024x768).jpg)
%20(1024x768).jpg)
%20(1024x768).jpg)
But here's the cool part about this installation---------I
also purchased the dimmer module you see here.
With this dimmer module and the way I wired this all up I have the option
on low beam to have the LED's
off----------or any brightness I want. I use the very low setting in the broad
daylight for excellent daylight
visibility. Then when I hit my regular high beam--------the LED's go to full
brite------that is awesome.
To do that----you have to tie the dimmer module into the high beam wire to
trigger the module to full bright LED's.
Wire colors I tied into at the mentioned un-used plug are:
Red/Yellow--------switched power
Green--------ground
Blue----high beam (to trigger the dimmer module)
%202(1024x768).jpg)
12-13-17
Bought and installed Mosko Moto Backcountry 35 saddlebags.

Got this windshield extension
installed.
It's the MRA X-creen "touring" model.
You can clamp it with provided clamps---------or do what I did and mount it
permanently by drilling holes
in the windshield------kind of tricky to not bust your windshield when you
do that.
You can tilt the windshield forward or back---------and with the included
arms (not installed in this picture)
you can raise and lower the shield a whole lot------even below the stock shield.
Maybe that will keep those pesky Alaska bugs out of my face.
And------by removing 2 small bolts you can remove it if you want.
%20(1024x768).jpg)
1-14-18
Installed "Seat Concepts" seat.
New foam was fitted for the front---but just used the stock foam for the rear
as I never carry a passenger.
.jpg)
Seems a very few of these bikes have had the bracket that
holds the windshield break at a weld.
I wasn't worried about it-------but added a huge heavy gps to my bike (Garmin
276C) and a
windshield extension and I became worried. So Camel ADV came up with this.
Frickin' genius this guy is--------I have been thinking for months about something
like this
but couldn't come up with anything. About $80 I think.
%20(1024x768).jpg)
It connects to the stock windshield bar and then goes down
below the dash to another bracket.
Kind of triangulates things and makes it 10 times stronger. It will never
break.
%20(1024x768).jpg)
It's easier if you take the windshield off.
Better have a box of those wellnuts for the windshield handy-------so when
you drop one into the abyss--you have another.
%20(1024x768).jpg)
%20(1280x960).jpg)
%20(1280x960).jpg)
Watch the video install before installing------I know you don't like reading instructions------you'll learn a few things.
%20(1280x960).jpg)
3-10-18
18,000 Miles
Installed Scotts Steering Damper.
I had the damper laying around from a bike I sold so this didn't cost me much
to do.
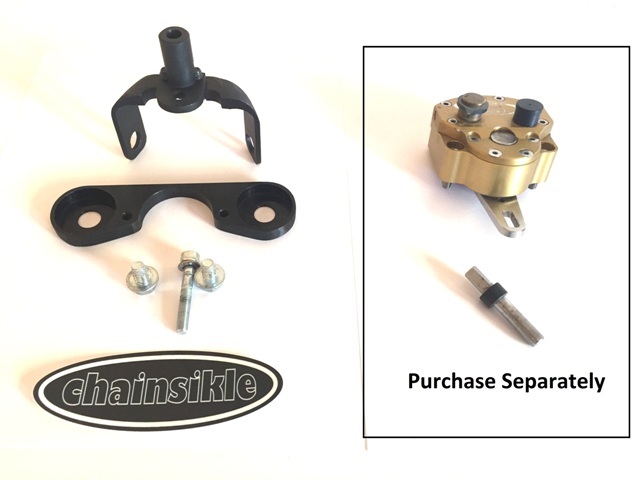
Here's the kit I ordered from chainsickle.com
About $125
This is super easy to install as you don't have to remove
the upper triple tree.
A bracket goes under you handlebar risers and the damper attaches to it.
I supported the handlebars as you see while doing this
which made it so easy.
Otherwise I'd of had to hadve 6 hands.
.jpg)
Risers were not necesary--but without them it would be
hard to get to the adjustment on the damper---so I got them too.
Another $25 I think.
.jpg)
Here's a picture of the mount for the tower pin-------again chainsicke made this easy.
.jpg)
I did have to order a different arm for this to work on
my bike.
They make a lot of different arms for different bikes---and the one that was
on my damper wouldn't work.
This is all in the instructions to do this.
The flat arm is the one I had to have--the stepped one was off my WR250R.
.jpg)
Don't try to remove an arm off a Scott Steering damper
without this tool---------you might ruin the damper.
I already had the tool.
.jpg)
Getting about done.
.jpg)
I had HDB handlebar clamps.
That wasn't a problem.
.jpg)